Darth Vader quilt

Christmas is here, and I can finally make a post about one quilt in particular.  I couldn’t make a peep about it anywhere on any of my social media outlets because the friend it was for was privy to all of them.

While visiting over the summer, a friend joked after seeing my other Star Wars silhouette quilts that I should make one with Darth Vader in the corridor – the scene in both Rogue One at the end and in Star Wars: A New Hope at the beginning.  A little while later, his sweet bride sent me a picture, asking about getting it made into a twin-sized quilt in the style I’d done with the others.

The original image
The original image

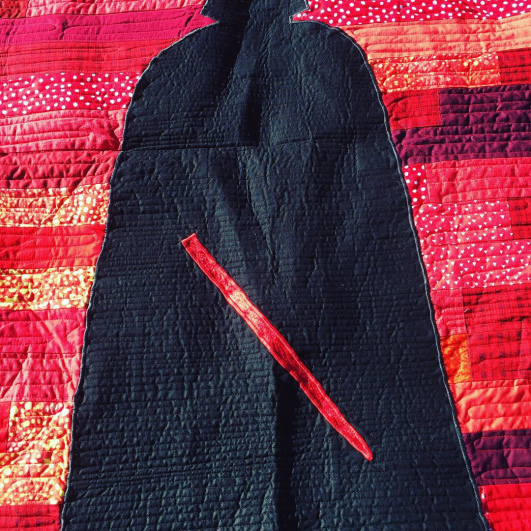
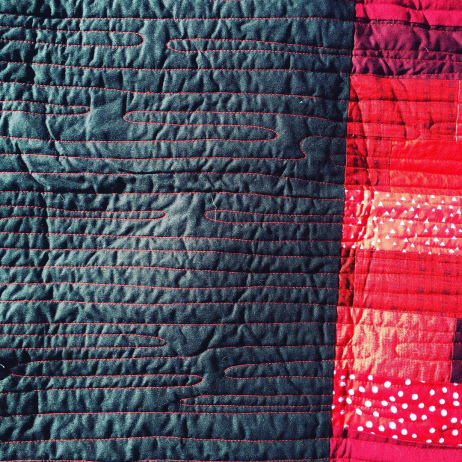
Well I LOVED the idea of all that red fabric, and I liked how it turned out as a background pattern for sure.  The silhouette was very simple, especially compared to the Rey and Kylo Ren quilt I’ve done a couple of times before.  I stuck with my usual style of using crepe back satin for the light saber.  I’ll forever love that fabric.

img_4018

The biggest surprise with this quilt was it was my first time using wool batting.  I’d heard of it before, but that was about it.  And let’s face it – I live in Georgia.  We don’t need wool blankets except for on a handful of days at best.  I was surprised at how light it was.  In fact, I halfway wondered if it wasn’t actually polyester.  I did some research and tried out the “burn test” on a small patch.  Sure enough, it burned and singed instead of melted, so it was the real deal.

img_4019

I made the quilt and then got really scared at the idea of washing this thing.  I have sinned against wool in the past, and I was nervous about repeating that mistake.  I finally decided I would rather wash it and take my chances with me first before sending it off to my friends.  So I washed it on the coldest, shortest, gentlest cycle my washing machine had to offer, and then I hung it out on my back deck to dry.  I’m proud to say that there were no casualties in the making of this quilt – cotton, wool, or otherwise.

img_4021

Related Posts:

Star Wars Quilt

Rey and BB8 Wall Quilt

Luke’s Last Sunset Wall Quilt


Star Wars Quilts: Episode 4

This is the last episode to compliment episodes 1, 2, and 3.  Thanks for sticking with me!

At this point, both the Luke and Darth Vader quilt and the Rey and Kylo Ren quilt were ready for my mid-arm quilting machine.  On the original one I made, I had quilted a very close pattern because of the different fabrics I’d used.  The quilt has a nice “hand” (the weight and how it hangs) and works wonderfully, so I decided to keep a good thing going.

You can see here the details and tight horizontal swirls pattern I used.

On the original quilt, my son chose the backing and picked a blue mottled stars and sky fabric.  It looked awesome but was among the more expensive fabrics.  For these, I went with a simple black to help tie together the silhouettes themselves to the overall look of the quilt.  With so many blue variations, the black was needed.  I also liked how you could see the impressions of the characters on the back.

IMG_2087

Here are the final results.

IMG_2092IMG_2091

I had originally wanted to wait and begin selling these at my next craft show, but I decided to go ahead and place them on Etsy.

So here is the link to the Luke and Darth Vader listing.

Here is the link to the Rey and Kylo Ren listing.

Related posts and blogs:

6 Reasons Why I Fangirl over Star Wars

Why Rey is of the Utmost Importance

The Last Jedi: Kylo Ren and Rey

Star Wars Quilts: Episode 2

This post is a continuation from yesterday’s.

After sewing all the strips together for two twin-sized quilts, I had to get to work on the silhouettes.  The Luke and Darth Vader ones were easy because I still had the silhouettes from the original quilt.

The key to making these quilts is to use the 805 Pellon fusible web interfacing.  I traced the images onto the interfacing, pinned them to the quilt, and then I ironed away.

IMG_2079

It’s strange.  When the 805 works like it’s supposed to and peels off properly, you get fabric with an entire side of glue that’s ready to be ironed onto another piece of fabric.  For these, some of the spots worked correctly, but I had a lot of areas that simply didn’t want to cooperate.  This is where I had to go back and pin again.  The fusible interfacing to there to ensure everything stays put and doesn’t shift while being sewn down.

The next step was the cut out the figures.

IMG_2080

I like to use gray for the lightsaber handle and satin for the lightsaber blades.  I had considered several other options before settling on satin, including glow-in-the-dark fabric.  But I couldn’t resist the sheen of the satin and liked how it “popped”.  I ironed the lightsabers on right after the figures were situated.

IMG_2081

I used the close-set zigzag stitch and my duel-feed foot to trace around my figures and make sure they were secure.  After Luke and Darth Vader were ready, I moved on to my newer silhouettes: Rey and Kylo Ren.

Stay tuned tomorrow for Episode 3.

Related posts and blogs:

DIY Star Wars Quilt

Raising Darth Vader

Supernerdydadreviews: A New Hope

Star Wars Quilts: Episode 1

A while back I wanted to use up some of my blue fabric from my fabric stash since the drawer was overflowing.  My son had recently asked for a Star Wars quilt, so I decided to take care of both challenges at the same time.

Fast forward to the fall of that year, and I am participating in a rather large craft fair – one of the largest I’d done.  I find out my booth is on the corner, and I panic because I simply can’t have the side of my booth be the backs of the quilts hanging up on the inside.  I needed something to hang on the outside of the booth, but I’d sold a couple of quilts on Etsy that would have done the job.  I ran upstairs and asked my little buddy if I could borrow his Star Wars quilt for the show.  He’s such a good sport and didn’t hesitate to agree.  I placed it on the outside, and the visibility was excellent.

IMG_2095
The original Star Wars quilt hanging outside my booth at a craft fair.

When I placed his quilt up, I expected it to gain some attention, but I wasn’t prepared for how much attention it would garner.  My booth neighbor behind me said that everyone who passed by her booth was talking about the Star Wars quilt.  I had several people ask about what it would cost to make one for them since I had a “Not for Sale” tag on my son’s.  I joked that if he wasn’t in charge of my end-of-life decisions I could have sold that quilt three times that day.  So it seemed a no-brainer that I would make one to sell after that show.

It didn’t hurt that I still had a lot of blue fabric left over from previous projects, gifted to me, or rescued from remnant bins.  The first thing I did was to get out all the blue fabric I intended on using and placed it in the order I wanted.

IMG_2067
All the blue fabric I intended on using.

After that, I cut them all into 3.5″ strips.

IMG_2068

From there, I sewed the strips end-to-end and rolled them up on an empty tissue holder.  The final radius of that roll was 4.25″.

There’s not much new in the quilting world in regards to techniques, but I *might* be the first person I know of to use what I call the “chair technique”.  I had my husband video the beginning of the process.

From here, I sewed together the strips into pairs so as to make organizing easier.

It was here I realized I had much more than the original twin-size quilt goal.  In fact, I had exactly enough strips cut to make TWO twin-sized quilts. I laid everything out and then picked up every other strip segment; this helped in that my strips were still going in order from lightest to darkest, allowing the silhouettes to be mostly in the lighter fabric.

I decided that I would make one with the original Luke and Darth Vader silhouettes like I had for my son, but the second one would be linked to the newest film and feature Rey and Kylo Ren.

Stayed tuned tomorrow for Episode 2.

Related posts and blogs:

Katy Quilts: Finish it Up Thursday

Aby Quilts: Star Wars Quilt Finished!

Legacy of a Last Jedi

%d bloggers like this: